# 一。什么是 Vuex?

Vuex 是一个专门为 Vue.js 应用程序开发的状态管理模式,它采用集中式存储管理所有组件的公共状态,并以相应的规则保证状态以一种可预测的方式发生变化.
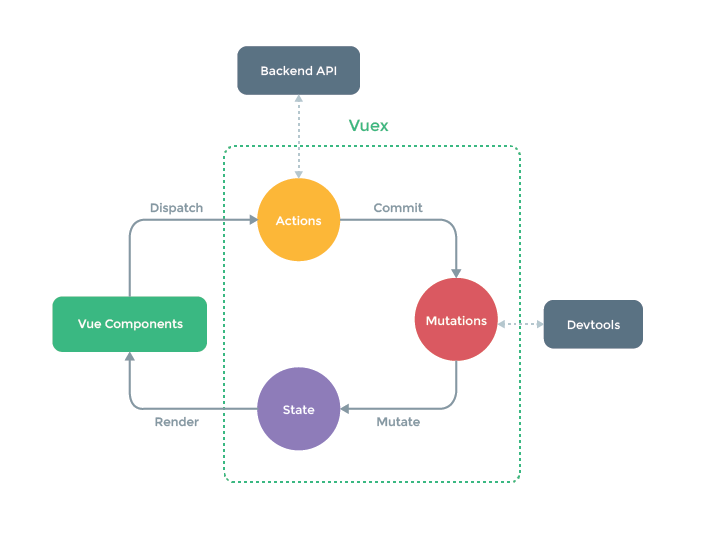
上图中绿色虚线包裹起来的部分就是 Vuex 的核心,<font style="color:red">state</font > 中保存的就是公共状态,改变 < font style="color:red">state</font > 的唯一方式就是通过 < font style="color:red">mutations</font > 进行更改。可能你现在看这张图有点不明白,等经过本文的解释和案例演示,再回来看这张图,相信你会有更好的理解.
# 二。为什么要使用 Vuex?
试想这样的场景,比如一个 Vue 的根实例下面有一个根组件名为 <font style="color:red">App.vue</font>, 它下面有两个子组件 < font style="color:red">A.vue</font > 和 < font style="color:red">B.vue</font>, <font style="color:red">App.vue</font > 想要与 < font style="color:red">A.vue</font > 或者 < font style="color:red">B.vue</font > 通讯可以通过 props 传值的方式,但是如果 < font style="color:red">A.vue</font > 和 < font style="color:red">B.vue</font > 之间的通讯就很麻烦了,他们需要共有的父组件通过自定义事件进行实现,A 组件想要和 B 组件通讯往往是这样的: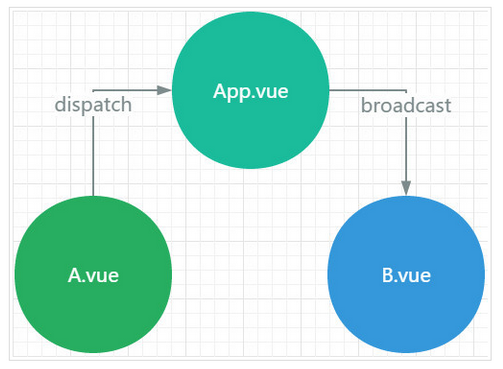
- A 组件说: "报告老大,能否帮我托个信给小弟 B" => dispatch 一个事件给 App
- App 老大说: "包在我身上,它需要监听 A 组件的 dispatch 的时间,同时需要 broadcast 一个事件给 B 组件"
- B 小弟说: "信息已收到", 它需要 on 监听 App 组件分发的事件
这只是一条通讯路径,如果父组件下有多个子组件,子组件之间通讯的路径就会变的很繁琐,父组件需要监听大量的事件,还需要负责分发给不同的子组件,很显然这并不是我们想要的组件化的开发体验.
Vuex 就是为了解决这一问题出现的
# 三。如何引入 Vuex?
下载 <font style="color:red">vuex: npm install vuex --save</font>
在 <font style="color:red">main.js</font > 添加:
import Vuex from 'vuex' | |
Vue.use( Vuex ); | |
const store = new Vuex.Store({ | |
// 待添加 | |
}) | |
new Vue({ | |
el: '#app', | |
store, | |
render: h => h(App) | |
}) |
# 四. Vuex 的核心概念?
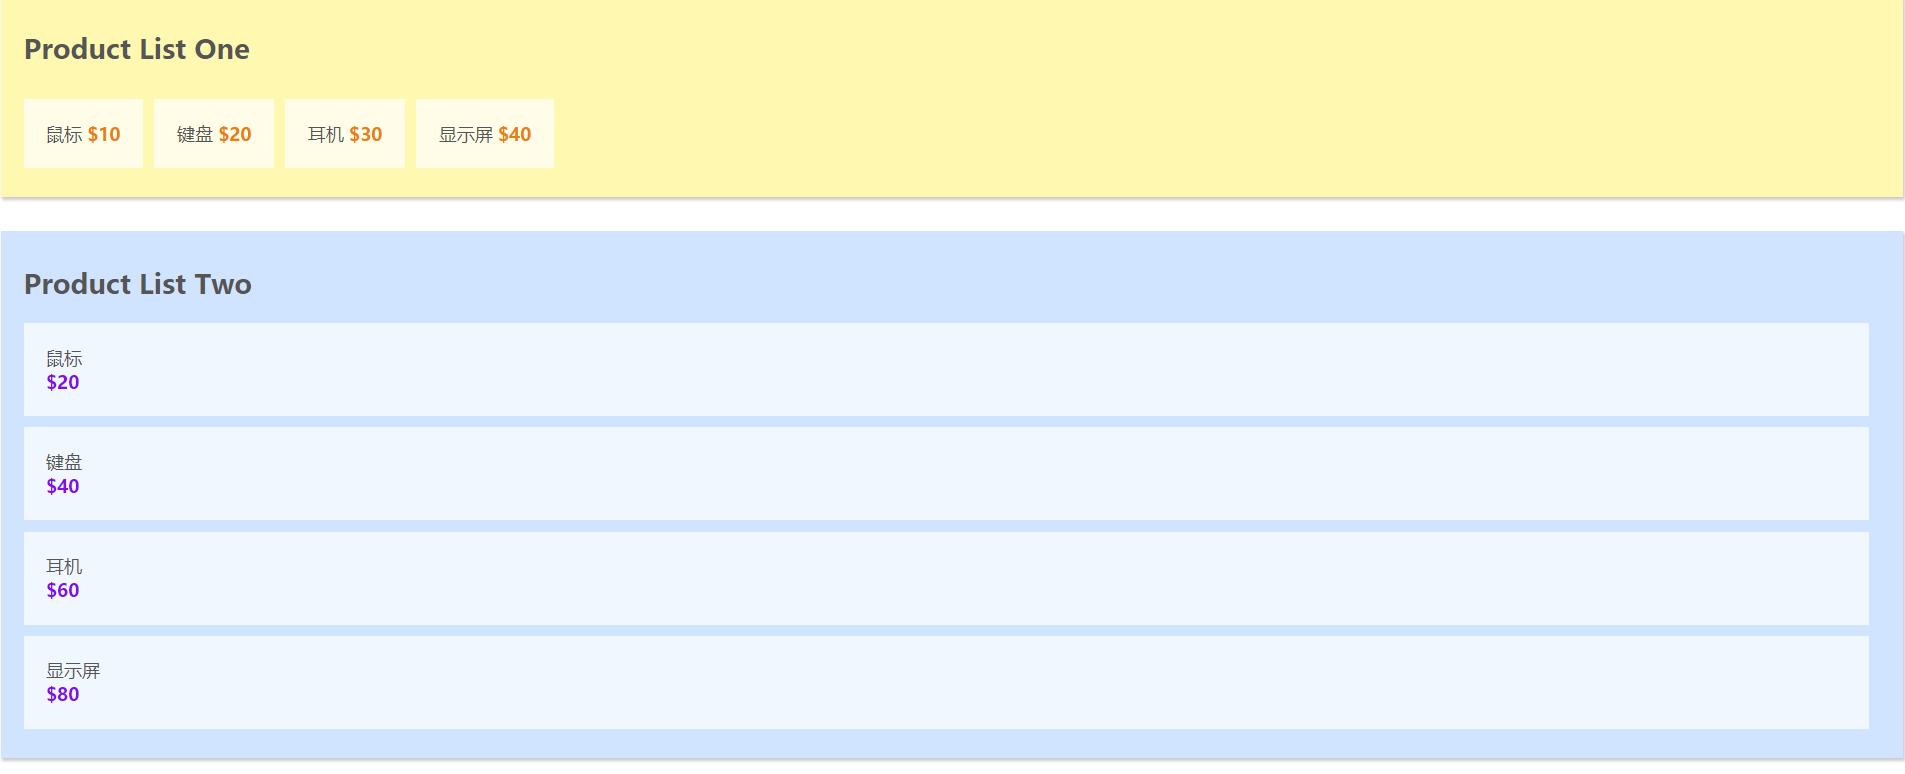
在介绍 Vuex 的核心概念之前,我使用 <font style="color:red">vue-cli</font > 初始化了一个 demo, 准备以代码的形式来说明 Vuex 的核心概念,大家可以在 github 上的 master 分支进行下载。这个 demo 分别有两个组件 <font style="color:red">ProductListOne.vue</font > 和 < font style="color:red">ProductListTwo.vue</font>, 在 < font style="color:red">App.vue</font > 的 < font style="color:red">datat</font > 中保存着共有的商品列表,代码和初始化的效果如下图所示:
//App.vue 中的初始化代码 | |
<template> | |
<div id="app"> | |
<product-list-one v-bind:products="products"></product-list-one> | |
<product-list-two v-bind:products="products"></product-list-two> | |
</div> | |
</template> | |
<script> | |
import ProductListOne from './components/ProductListOne.vue' | |
import ProductListTwo from './components/ProductListTwo.vue' | |
export default { | |
name: 'app', | |
components: { | |
'product-list-one': ProductListOne, | |
'product-list-two': ProductListTwo | |
}, | |
data () { | |
return { | |
products: [ | |
{name: '鼠标', price: 20}, | |
{name: '键盘', price: 40}, | |
{name: '耳机', price: 60}, | |
{name: '显示屏', price: 80} | |
] | |
} | |
} | |
} | |
</script> | |
<style> | |
body{ | |
font-family: Ubuntu; | |
color: #555; | |
} | |
</style> |
//ProductListOne.vue | |
<template> | |
<div id="product-list-one"> | |
<h2>Product List One</h2> | |
<ul> | |
<li v-for="product in products"> | |
<span class="name"><!--swig0--></span> | |
<span class="price">$<!--swig1--></span> | |
</li> | |
</ul> | |
</div> | |
</template> | |
<script> | |
export default { | |
props: ['products'], | |
data () { | |
return { | |
} | |
} | |
} | |
</script> | |
<style scoped> | |
#product-list-one{ | |
background: #FFF8B1; | |
box-shadow: 1px 2px 3px rgba(0,0,0,0.2); | |
margin-bottom: 30px; | |
padding: 10px 20px; | |
} | |
#product-list-one ul{ | |
padding: 0; | |
} | |
#product-list-one li{ | |
display: inline-block; | |
margin-right: 10px; | |
margin-top: 10px; | |
padding: 20px; | |
background: rgba(255,255,255,0.7); | |
} | |
.price{ | |
font-weight: bold; | |
color: #E8800C; | |
} | |
</style> |
//ProductListTwo.vue | |
<template> | |
<div id="product-list-two"> | |
<h2>Product List Two</h2> | |
<ul> | |
<li v-for="product in products"> | |
<span class="name"><!--swig2--></span> | |
<span class="price">$<!--swig3--></span> | |
</li> | |
</ul> | |
</div> | |
</template> | |
<script> | |
export default { | |
props: ['products'], | |
data () { | |
return { | |
} | |
} | |
} | |
</script> | |
<style scoped> | |
#product-list-two{ | |
background: #D1E4FF; | |
box-shadow: 1px 2px 3px rgba(0,0,0,0.2); | |
margin-bottom: 30px; | |
padding: 10px 20px; | |
} | |
#product-list-two ul{ | |
padding: 0; | |
list-style-type: none; | |
} | |
#product-list-two li{ | |
margin-right: 10px; | |
margin-top: 10px; | |
padding: 20px; | |
background: rgba(255,255,255,0.7); | |
} | |
.price{ | |
font-weight: bold; | |
color: #860CE8; | |
display: block; | |
} | |
</style> |
# 核心概念 1: State
<font style="color:red">state</font > 就是 Vuex 中的公共的状态,我是将 < font style="color:red">state</font > 看作是所有组件的 < font style="color:red">data</font>, 用于保存所有组件的公共数据.
- 此时我们就可以把 App.vue 中的两个组件共同使用的 data 抽离出来,放到 state 中,代码如下:
//main.js | |
import Vue from 'vue' | |
import App from './App.vue' | |
import Vuex from 'vuex' | |
Vue.use( Vuex ) | |
const store = new Vuex.Store({ | |
state:{ | |
products: [ | |
{name: '鼠标', price: 20}, | |
{name: '键盘', price: 40}, | |
{name: '耳机', price: 60}, | |
{name: '显示屏', price: 80} | |
] | |
} | |
}) | |
new Vue({ | |
el: '#app', | |
store, | |
render: h => h(App) | |
}) |
- 此时,<font style="color:red">ProductListOne.vue</font > 和 < font style="color:red">ProductListTwo.vue</font > 也需要做相应的更改
//ProductListOne.vue | |
export default { | |
data () { | |
return { | |
products : this.$store.state.products // 获取 store 中 state 的数据 | |
} | |
} | |
} |
//ProductListTwo.vue | |
export default { | |
data () { | |
return { | |
products: this.$store.state.products // 获取 store 中 state 的数据 | |
} | |
} | |
} |
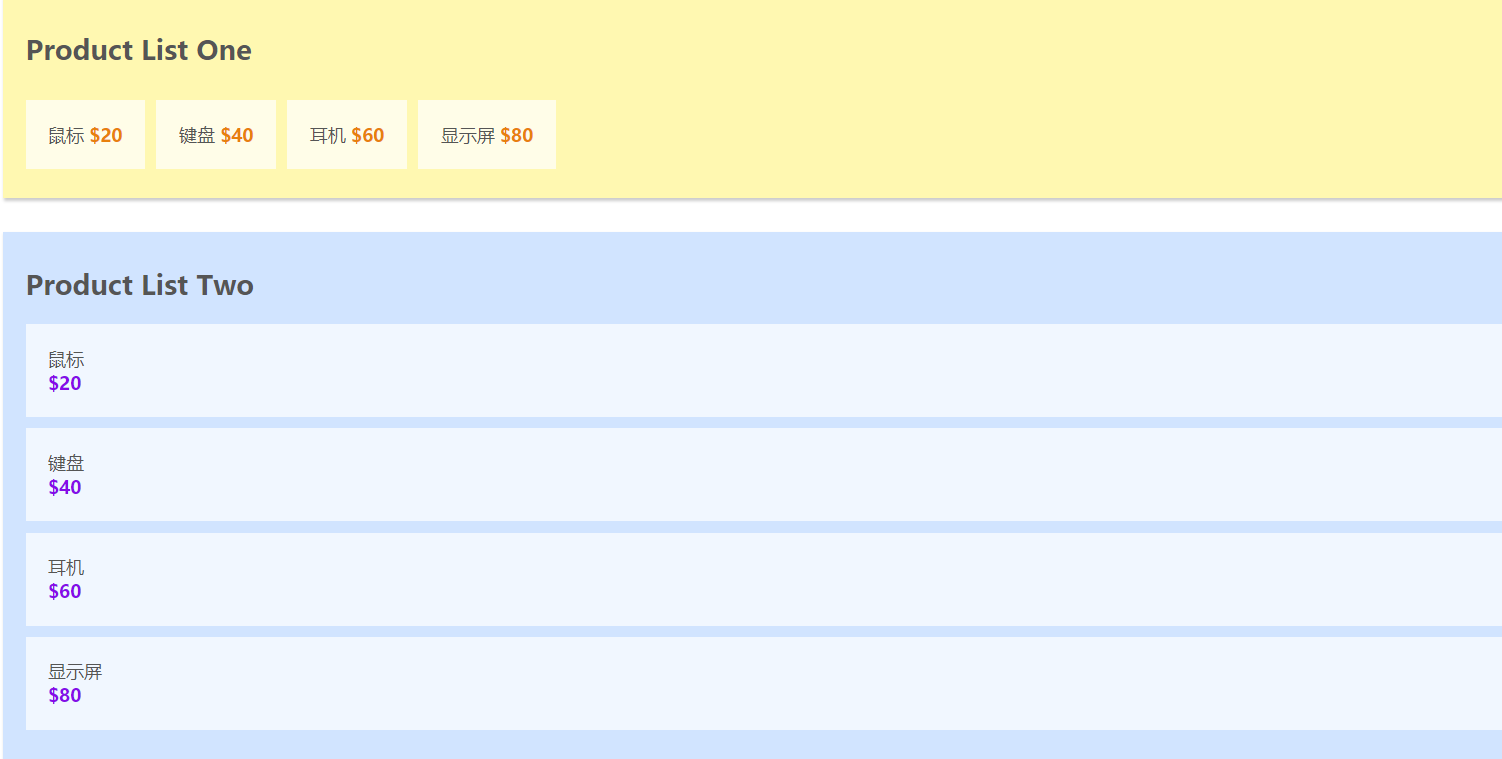
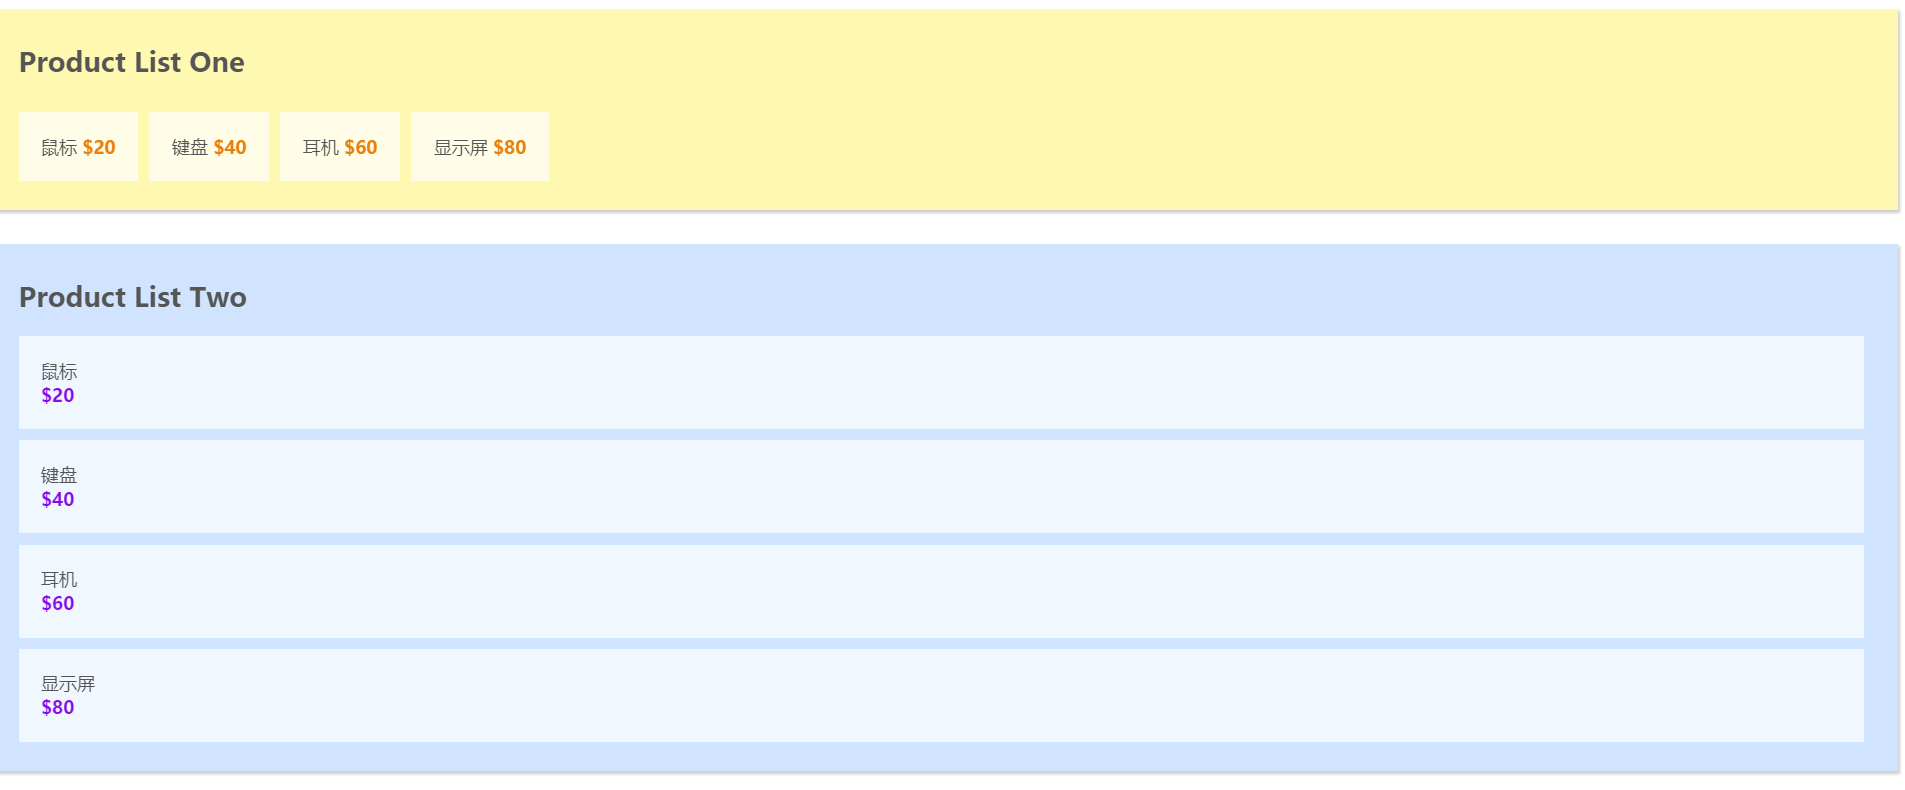
- 此时的页面如下图所示,可以看到,将公共数据抽离出来后,页面没有发生变化.
![state效果]()
到此处的 Github 仓库中代码为: 分支 code01
# 核心概念 2: Getters
我将 <font style="color:red">getters</font > 属性理解为所有组件的 < font style="color:red">computed</font > 属性,也就是计算属性. vuex 的官方文档也是说到可以将 getter 理解为 store 的计算属性,getters 的返回值会根据它的依赖被缓存起来,且只有当它的依赖值发生了改变才会被重新计算。
- 此时,我们可以在 <font style="color:red">main.js</font > 中添加一个 < font style="color:red">getters</font > 属性,其中的 < font style="color:red">saleProducts</font > 对象将 < font style="color:red">state</font > 中的价格减少一半 (除以 2)
//main.js | |
const store = new Vuex.Store({ | |
state:{ | |
products: [ | |
{name: '鼠标', price: 20}, | |
{name: '键盘', price: 40}, | |
{name: '耳机', price: 60}, | |
{name: '显示屏', price: 80} | |
] | |
}, | |
getters:{ // 添加 getters | |
saleProducts: (state) => { | |
let saleProducts = state.products.map( product => { | |
return { | |
name: product.name, | |
price: product.price / 2 | |
} | |
}) | |
return saleProducts; | |
} | |
} | |
}) |
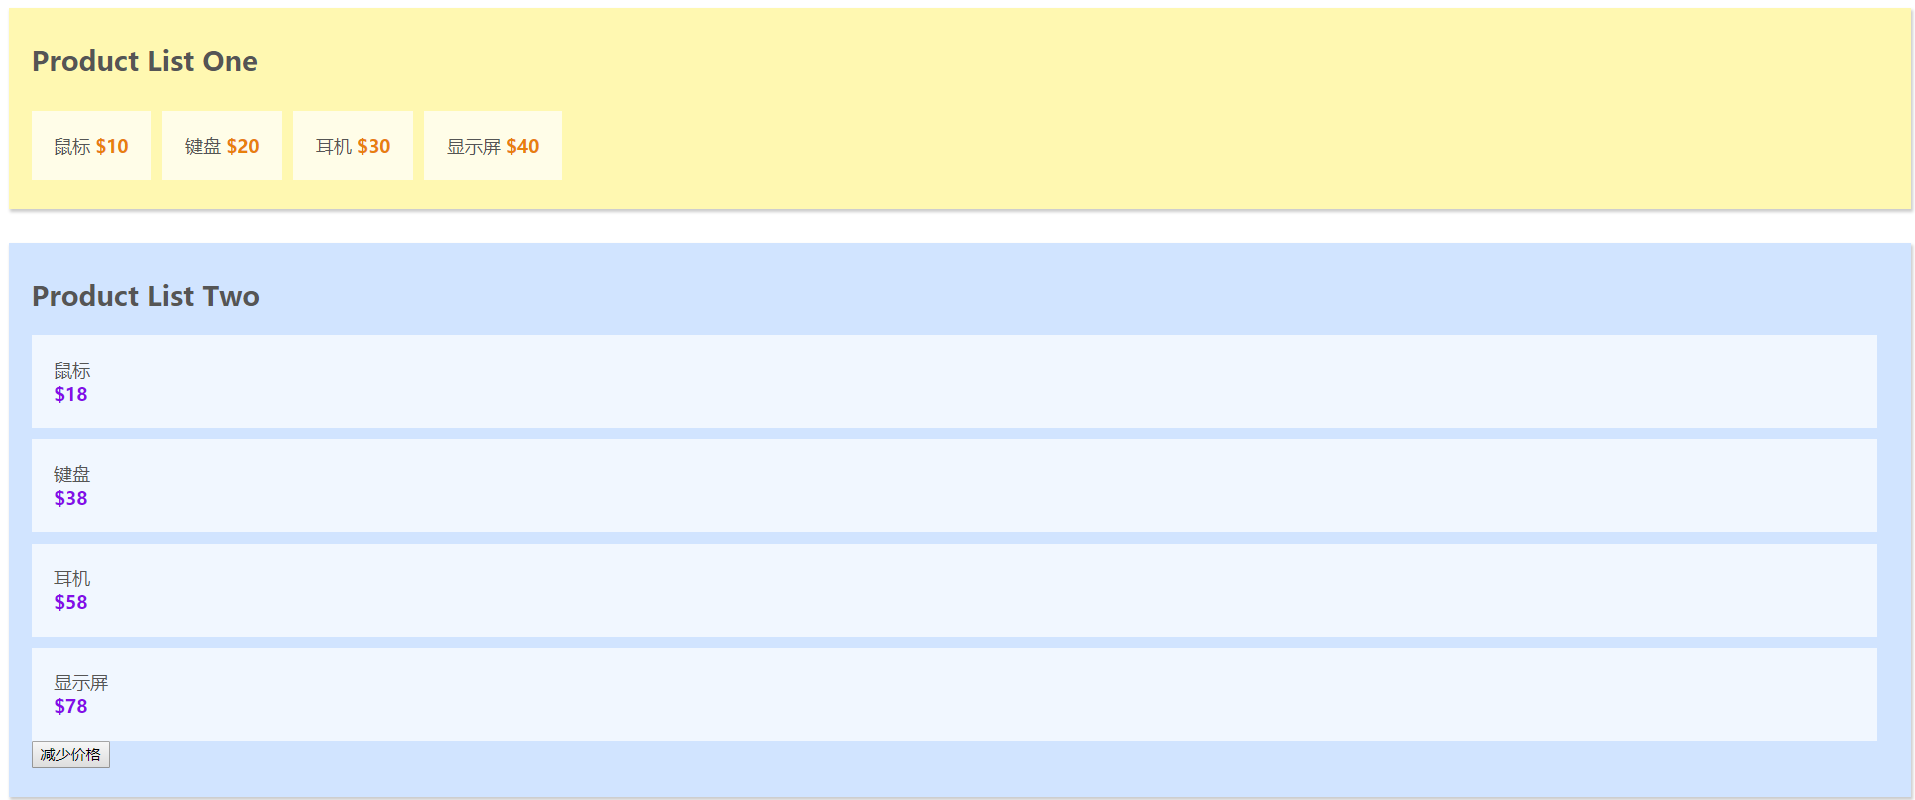
- 将 <font style="color:red">productListOne.vue</font > 中的 < font style="color:red">products</font > 的值更换为 < font style="color:red">this.$store.getters.saleProducts</font>
export default { | |
data () { | |
return { | |
products : this.$store.getters.saleProducts | |
} | |
} | |
} |
- 现在的页面中,Product List One 中的每项商品的价格都减少了一半
![getters效果]()
到此处的 Github 仓库中代码为: 分支 code02
# 核心概念 3: Mutations
我将 <font style="color:red">mutaions</font > 理解为 < font style="color:red">store</font > 中的 < font style="color:red">methods</font>, <font style="color:red">mutations</font > 对象中保存着更改数据的回调函数,该函数名官方规定叫 < font style="color:red">type</font>, 第一个参数是 < font style="color:red">state</font>, 第二参数是 < font style="color:red">payload</font>, 也就是自定义的参数.
- 下面,我们在 <font style="color:red">main.js</font > 中添加 < font style="color:red">mutations</font > 属性,其中 < font style="color:red">minusPrice</font > 这个回调函数用于将商品的价格减少 < font style="color:red">payload</font > 这么多,代码如下:
//main.js | |
const store = new Vuex.Store({ | |
state:{ | |
products: [ | |
{name: '鼠标', price: 20}, | |
{name: '键盘', price: 40}, | |
{name: '耳机', price: 60}, | |
{name: '显示屏', price: 80} | |
] | |
}, | |
getters:{ | |
saleProducts: (state) => { | |
let saleProducts = state.products.map( product => { | |
return { | |
name: product.name, | |
price: product.price / 2 | |
} | |
}) | |
return saleProducts; | |
} | |
}, | |
mutations:{ // 添加 mutations | |
minusPrice (state, payload ) { | |
let newPrice = state.products.forEach( product => { | |
product.price -= payload | |
}) | |
} | |
} | |
}) |
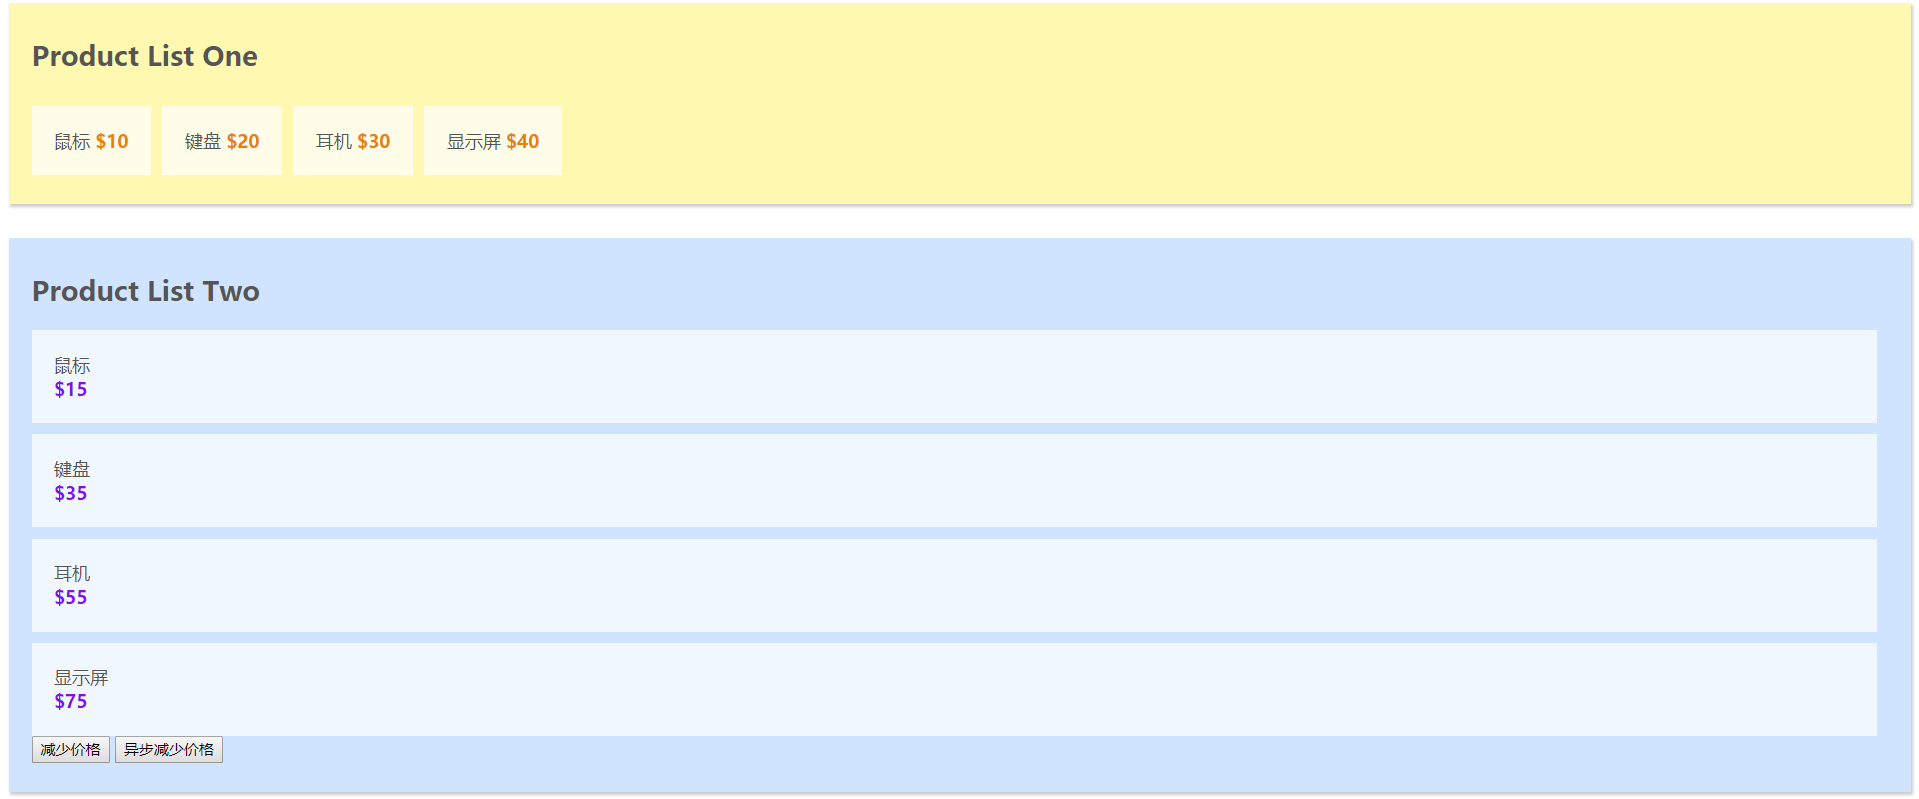
- 在 <font style="color:red">ProductListTwo.vue</font > 中添加一个按钮,为其添加一个点击事件,给点击事件触发 < font style="color:red">minusPrice</font > 方法
//ProductListTwo.vue | |
<template> | |
<div id="product-list-two"> | |
<h2>Product List Two</h2> | |
<ul> | |
<li v-for="product in products"> | |
<span class="name"><!--swig4--></span> | |
<span class="price">$<!--swig5--></span> | |
</li> | |
<button @click="minusPrice">减少价格</button> // 添加按钮 | |
</ul> | |
</div> | |
</template> |
- 在 <font style="color:red">ProductListTwo.vue</font > 中注册 < font style="color:red">minusPrice</font > 方法,在该方法中 < font style="color:red">commitmutations</font > 中的 < font style="color:red">minusPrice</font > 这个回调函数
注意:调用 mutaions 中回调函数,只能使用 store.commit (type, payload)
//ProductListTwo.vue | |
export default { | |
data () { | |
return { | |
products: this.$store.state.products | |
} | |
}, | |
methods: { | |
minusPrice() { | |
this.$store.commit('minusPrice', 2); // 提交 `minusPrice,payload 为 2 | |
} | |
} | |
} |
- 添加按钮,可以发现,Product List Two 中的价格减少了 2, 当然你可以自定义 <font style="color:red">payload</font>, 以此自定义减少对应的价格.
![mutations效果]()
(Product List One 中的价格没有发生变化,是因为 getters 将价格进行了缓存)
到此处的 Github 仓库中代码为: 分支 code03
# 核心概念 4: Actions
<font style="color:red">actions</font> 类似于 <font style="color:red">mutations</font>,不同在于:
- <font style="color:red">actions</font > 提交的是 < font style="color:red">mutations</font > 而不是直接变更状态
- <font style="color:red">actions</font > 中可以包含异步操作,<font style="color:red">mutations</font > 中绝对不允许出现异步
- <font style="color:red">actions</font > 中的回调函数的第一个参数是 < font style="color:red">context</font>, 是一个与 < font style="color:red">store</font > 实例具有相同属性和方法的对象
- 此时,我们在 <font style="color:red">store</font > 中添加 < font style="color:red">actions</font > 属性,其中 < font style="color:red">minusPriceAsync</font > 采用 < font style="color:red">setTimeout</font > 来模拟异步操作,延迟 2s 执行 该方法用于异步改变我们刚才在 < font style="color:red">mutaions</font > 中定义的 < font style="color:red">minusPrice</font>
//main.js | |
const store = new Vuex.Store({ | |
state:{ | |
products: [ | |
{name: '鼠标', price: 20}, | |
{name: '键盘', price: 40}, | |
{name: '耳机', price: 60}, | |
{name: '显示屏', price: 80} | |
] | |
}, | |
getters:{ | |
saleProducts: (state) => { | |
let saleProducts = state.products.map( product => { | |
return { | |
name: product.name, | |
price: product.price / 2 | |
} | |
}) | |
return saleProducts; | |
} | |
}, | |
mutations:{ | |
minusPrice (state, payload ) { | |
let newPrice = state.products.forEach( product => { | |
product.price -= payload | |
}) | |
} | |
}, | |
actions:{ // 添加 actions | |
minusPriceAsync( context, payload ) { | |
setTimeout( () => { | |
context.commit( 'minusPrice', payload ); //context 提交 | |
}, 2000) | |
} | |
} | |
}) |
- 在 <font style="color:red">ProductListTwo.vue</font > 中添加一个按钮,为其添加一个点击事件,给点击事件触发 < font style="color:red">minusPriceAsync</font > 方法
<template> | |
<div id="product-list-two"> | |
<h2>Product List Two</h2> | |
<ul> | |
<li v-for="product in products"> | |
<span class="name"><!--swig6--></span> | |
<span class="price">$<!--swig7--></span> | |
</li> | |
<button @click="minusPrice">减少价格</button> | |
<button @click="minusPriceAsync">异步减少价格</button> // 添加按钮 | |
</ul> | |
</div> | |
</template> |
- 在 <font style="color:red">ProductListTwo.vue</font > 中注册 < font style="color:red">minusPriceAsync</font > 方法,在该方法中 < font style="color:red">dispatchactions</font > 中的 < font style="color:red">minusPriceAsync</font > 这个回调函数
export default { | |
data () { | |
return { | |
products: this.$store.state.products | |
} | |
}, | |
methods: { | |
minusPrice() { | |
this.$store.commit('minusPrice', 2); | |
}, | |
minusPriceAsync() { | |
this.$store.dispatch('minusPriceAsync', 5); // 分发 actions 中的 minusPriceAsync 这个异步函数 | |
} | |
} | |
} |
- 添加按钮,可以发现,Product List Two 中的价格延迟 2s 后减少了 5
![actions效果]()
到此处的 Github 仓库中代码为: 分支 code04
# 核心概念 5: Modules
由于使用单一状态树,应用的所有状态会集中到一个比较大的对象。当应用变得非常复杂时,store 对象就有可能变得相当臃肿。为了解决以上问题,Vuex 允许我们将 store 分割成模块(module)。每个模块拥有自己的 state、mutation、action、getter、甚至是嵌套子模块 —— 从上至下进行同样方式的分割
const moduleA = { | |
state: { ... }, | |
mutations: { ... }, | |
actions: { ... }, | |
getters: { ... } | |
} | |
const moduleB = { | |
state: { ... }, | |
mutations: { ... }, | |
actions: { ... } | |
} | |
const store = new Vuex.Store({ | |
modules: { | |
a: moduleA, | |
b: moduleB | |
} | |
}) | |
store.state.a //-> moduleA 的状态 | |
store.state.b //-> moduleB 的状态 |
【相关链接】
本文代码地址: https://github.com/Lee-Tanghui/Vuex-Demo
Vuex 官方文档: https://vuex.vuejs.org/zh-cn/intro.html
Vuex 官方案例演示源码: https://github.com/vuejs/vuex/tree/dev/examples