
1.初始化项目
1.node版本要求
node:v18.19.0
2.vscode插件安装
Vue - Official,Prettier - Code formatter,ESlint
提示:确保开发vue2时的Vetur插件禁用3.创建项目
npm create vite@latest vite-vue-ts-seed -- --template vue-ts提示:vscode在文件中通过鼠标右击,选择使用…格式化文档,将prettier插件设为默认值
4.安装项目依赖
yarn2.配置 tsconfig
1.新建 src/typings.d.ts(在src文件夹下新建)
//声明window上自定义属性,如事件总线
declare interface Window {
  eventBus: any;
}

//声明.vue文件
declare module "*.vue" {
  import { DefineComponent } from "vue";
  const component: DefineComponent<object, object, any>;
  export default component;
}
提示:遇到ts报错,有些时候是配置未生效,可以重启vscode或ts服务(vscode快捷键 ctrl+shift+p调出命令行,输入Restart TS Server)
2.修改package.json
"scripts": {
   "ts": "vue-tsc -b",
},
运行 yarn run ts 即可查看文件是否有ts类型错误
3.配置 src路径别名
1.安装
pnpm install @types/node -D2.修改vite.config.ts
import { defineConfig } from "vite";
import vue from "@vitejs/plugin-vue";
import path from "path"; //这个path用到了上面安装的@types/node

// https://vitejs.dev/config/
export default defineConfig({
  plugins: [vue()],
  //这里进行配置别名
  resolve: {
    alias: {
      "@": path.resolve("./src"), // @代替src
    },
  },
});
3.修改tsconfig.app.json
{
  "compilerOptions":{
      //新增
      "baseUrl": ".", //查询的基础路径
      "paths": { "@/*": ["src/*"] }, //路径映射,配合别名使用
  }
}
4.配置 ESLint 、prettier、stylelint
1.安装
//eslint 安装
pnpm install eslint@^8.39.0 -D

//eslint vue插件安装
pnpm install eslint-plugin-vue@^9.11.0 -D

//eslint 识别ts语法
pnpm install @typescript-eslint/parser@^6.19.0 -D

//eslint ts默认规则补充
pnpm install @typescript-eslint/eslint-plugin@^6.19.0 -D

//eslint prettier插件安装
pnpm install eslint-plugin-prettier@^5.1.3 -D

//用来解决与eslint的冲突
pnpm install eslint-config-prettier@^9.1.0 -D

//安装prettier
pnpm install prettier@^3.2.4 -D
2.新建.eslintrc.cjs
module.exports = {
  env: {
    browser: true,
    node: true,
    es2021: true,
  },
  parser: "vue-eslint-parser",
  extends: [
    "eslint:recommended", //继承 ESLint 内置的推荐规则
    "plugin:vue/vue3-recommended", // 继承 Vue.js 3 的推荐规则
    "plugin:@typescript-eslint/recommended", //继承 TypeScript ESLint 插件的推荐规则
    "plugin:prettier/recommended", //继承 Prettier 的推荐规则
    "eslint-config-prettier", //关闭 ESLint 中与 Prettier 冲突的规则
  ],
  parserOptions: {
    ecmaVersion: "latest",
    parser: "@typescript-eslint/parser",
    sourceType: "module",
    ecmaFeatures: {
      jsx: true,
    },
  },
  ignorePatterns: ["dist", "node_modules", ".eslintrc.cjs", "commitlint.config.cjs"],
  plugins: ["vue", "@typescript-eslint", "prettier"],
  rules: {
    "vue/multi-word-component-names": "off", // 禁用vue文件强制多个单词命名
    "@typescript-eslint/no-explicit-any": "off", //允许使用any
    "@typescript-eslint/no-this-alias": [
      "error",
      {
        allowedNames: ["that"], // this可用的局部变量名称
      },
    ],
    "@typescript-eslint/ban-ts-comment": "off", //允许使用@ts-ignore
    "@typescript-eslint/no-non-null-assertion": "off", //允许使用非空断言
    "no-console": [
      //提交时不允许有console.log
      "warn",
      {
        allow: ["warn", "error"],
      },
    ],
    "no-debugger": "warn", //提交时不允许有debugger
  },
};rules更多配置:eslint.org/docs/latest…
3.新建 .prettierrc
{
    "endOfLine": "auto",
    "printWidth": 120,
    "semi": true,
    "singleQuote": true,
    "tabWidth": 2,
    "trailingComma": "all",
    "bracketSpacing": true
}
4.新建 .prettierignore
# 忽略格式化文件 (根据项目需要自行添加)
node_modules
dist
5.重启vscode使配置生效
6.配置package.json
可以看到App.vue文件在import处飘红,因为结尾没有使用分号
修改package.json
"scripts": {
    "lint": "eslint src --fix --ext .js,.ts,.vue --report-unused-disable-directives --max-warnings 0"
},
运行 yarn run lint,可以看到上述eslint(prettier/prettier)问题都将被修复
7.配置stylelint
1.安装依赖
执行
pnpm create stylelint
# or
pnpm init stylelint将会生成.stylelintrc.json文件, 自动安装stylelint和stylelint-config-standard依赖
2.安装规则配置文件
执行
pnpm add stylelint-config-recommended-less stylelint-config-standard-vue less -Dstylelint-config-recommended-less–less的推荐可共享配置规则stylelint-config-standard-vue可识别vue文件
3.配置
从 Stylelint v15 开始,所有与样式相关的规则都已弃用。如果您使用的是 v15 或更高版本,并且未使用这些弃用的规则,则stylelint-config-prettier插件不再是必要的。
新建文件.stylelintrc.json
// .stylelintrc.json
{
    "extends": [
        "stylelint-config-standard",
        "stylelint-config-recommended-less",
        "stylelint-config-standard-vue"
    ]
}
5.配置 husky、lint-staged、@commitlint/cli
husky:一个为git客户端增加hook的工具
lint-staged:仅对Git 代码暂存区文件进行处理,配合husky使用
@commitlint/cli:让commit信息规范化
1.创建git仓库
git init2.安装
pnpm install husky@9.1.3 -D

pnpm install lint-staged@^15.2.7 -D

pnpm install @commitlint/cli@^19.3.0 -D

pnpm install @commitlint/config-conventional@^19.2.2 -D
3.生成 .husky 的文件夹
npx husky install4.修改.husky/pre-commit
#!/usr/bin/env sh
npx --no-install lint-staged
5.修改.husky/commit-msg
#!/usr/bin/env sh
npx --no-install commitlint --edit $1
6.修改package.json
"lint-staged": {
  "src/**/*.{js,ts,vue}": [
    "yarn run lint",
    "prettier --write"
  ]
}
7.新建commitlint.config.cjs
提示:由于package.json的“type”: “module”,需将commonjs文件显示声明为.cjs
module.exports = {
  extends: ['@commitlint/config-conventional'],
};
提交格式:
git commit -m <type>[optional scope]: <description> //注意冒号后面有空格
- type:提交的类型(如新增、修改、更新等)
- optional scope:涉及的模块,可选
- description:任务描述
type类型:
| 类别 | 含义 |
|---|---|
| feat | 新功能 |
| fix | 修复 bug |
| style | 样式修改(UI校验) |
| docs | 文档更新 |
| refactor | 重构代码(既没有新增功能,也没有修复 bug) |
| perf | 优化相关,比如提升性能、体验 |
| test | 增加测试,包括单元测试、集成测试等 |
| build | 构建系统或外部依赖项的更改 |
| ci | 自动化流程配置或脚本修改 |
| revert | 回退某个commit提交 |
8.示范(非规范提交,将提交失败)
git commit -m 'feat: 增加 xxx 功能'
git commit -m 'bug: 修复 xxx 功能'
6.vscode 保存自动格式化
在.vscode下新建 settings.json
{
  "editor.codeActionsOnSave": {
    "source.fixAll": "explicit"
  }
}
之后每次文件有修改,保存时,都会自动格式化
7.配置 vue-router
1.安装 vue-router
npm install vue-router@next2.路由实例
创建路由实例,顺带初始化静态路由,而动态路由需要用户登录,根据用户拥有的角色进行权限校验后进行初始化
// src/router/index.ts
import { createRouter, createWebHashHistory, RouteRecordRaw } from 'vue-router';

export const Layout = () => import('@/layout/index.vue');

// 静态路由
export const constantRoutes: RouteRecordRaw[] = [
  {
    path: '/redirect',
    component: Layout,
    meta: { hidden: true },
    children: [
      {
        path: '/redirect/:path(.*)',
        component: () => import('@/views/redirect/index.vue')
      }
    ]
  },

  {
    path: '/login',
    component: () => import('@/views/login/index.vue'),
    meta: { hidden: true }
  },

  {
    path: '/',
    component: Layout,
    redirect: '/dashboard',
    children: [
      {
        path: 'dashboard',
        component: () => import('@/views/dashboard/index.vue'),
        name: 'Dashboard',
        meta: { title: 'dashboard', icon: 'homepage', affix: true }
      }
    ]
  }
];

/**
 * 创建路由
 */
const router = createRouter({
  history: createWebHashHistory(),
  routes: constantRoutes as RouteRecordRaw[],
  // 刷新时,滚动条位置还原
  scrollBehavior: () => ({ left: 0, top: 0 })
});

/**
 * 重置路由
 */
export function resetRouter() {
  router.replace({ path: '/login' });
  location.reload();
}

export default router;
3.全局注册路由实例
// main.ts
import router from "@/router";

app.use(router).mount('#app')
4.动态权限路由
路由守卫 src/permission.ts ,获取当前登录用户的角色信息进行动态路由的初始化
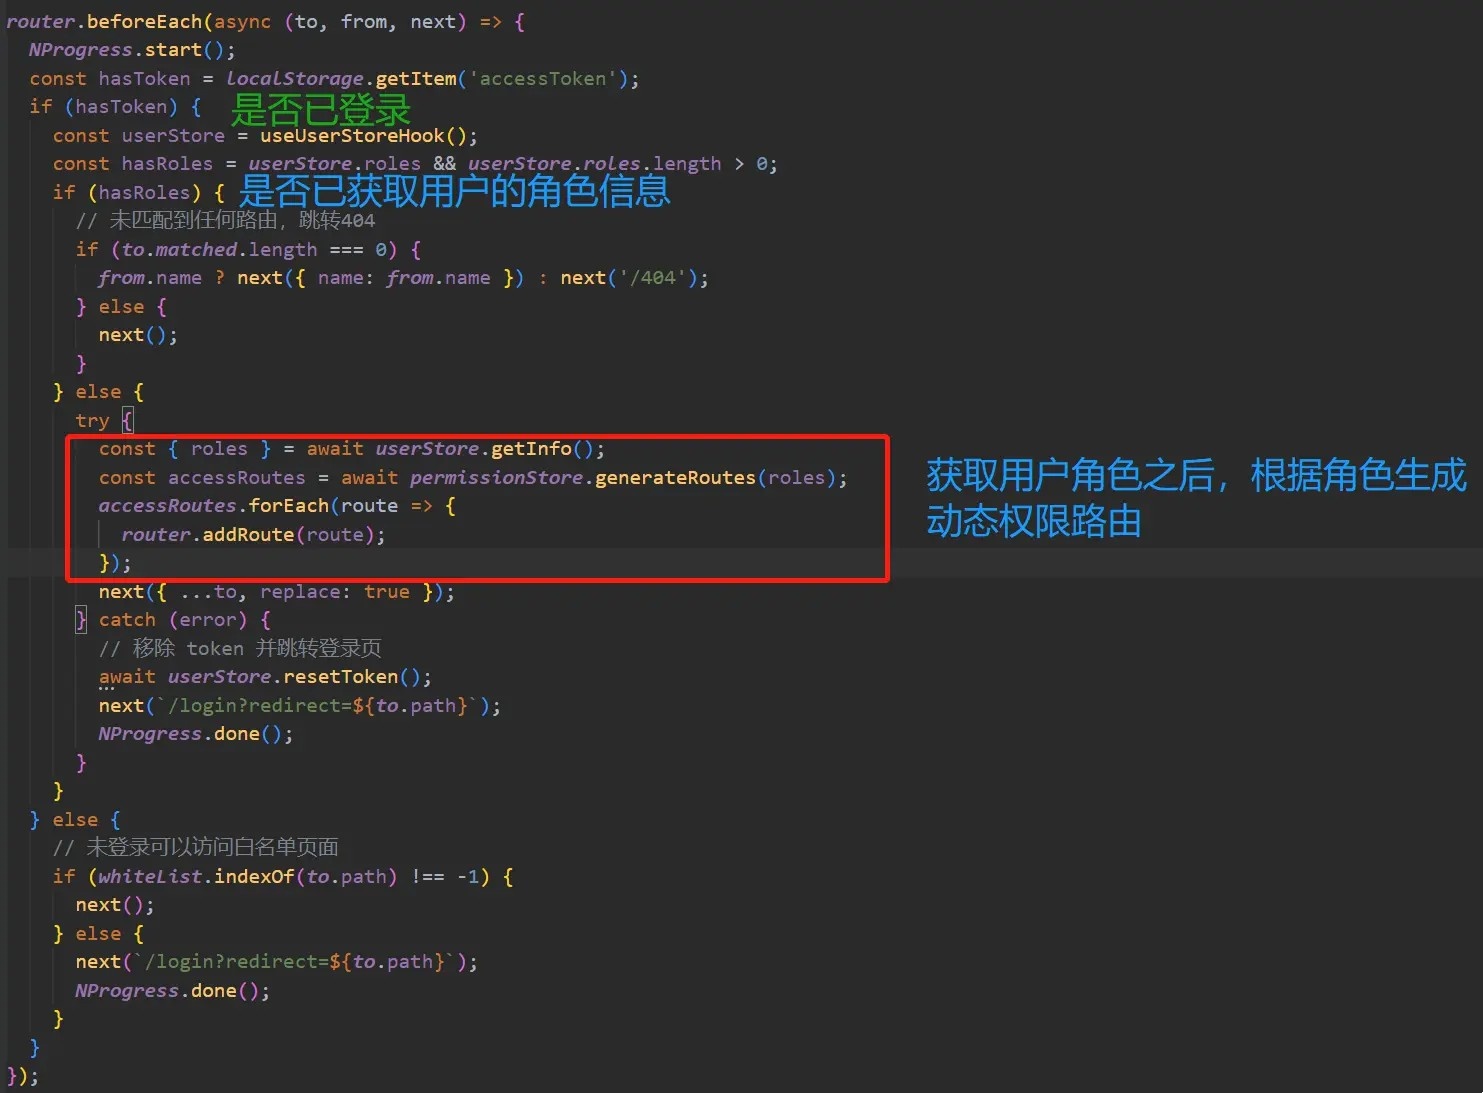
最终调用 permissionStore.generateRoutes(roles) 方法生成动态路由
// src/store/modules/permission.ts
import { listRoutes } from '@/api/menu';

export const usePermissionStore = defineStore('permission', () => {
  const routes = ref<RouteRecordRaw[]>([]);

  function setRoutes(newRoutes: RouteRecordRaw[]) {
    routes.value = constantRoutes.concat(newRoutes);
  }
  /**
   * 生成动态路由
   *
   * @param roles 用户角色集合
   * @returns
   */
  function generateRoutes(roles: string[]) {
    return new Promise<RouteRecordRaw[]>((resolve, reject) => {
      // 接口获取所有路由
      listRoutes()
        .then(({ data: asyncRoutes }) => {
          // 根据角色获取有访问权限的路由
          const accessedRoutes = filterAsyncRoutes(asyncRoutes, roles);
          setRoutes(accessedRoutes);
          resolve(accessedRoutes);
        })
        .catch(error => {
          reject(error);
        });
    });
  }
  // 导出 store 的动态路由数据 routes
  return { routes, setRoutes, generateRoutes };
});
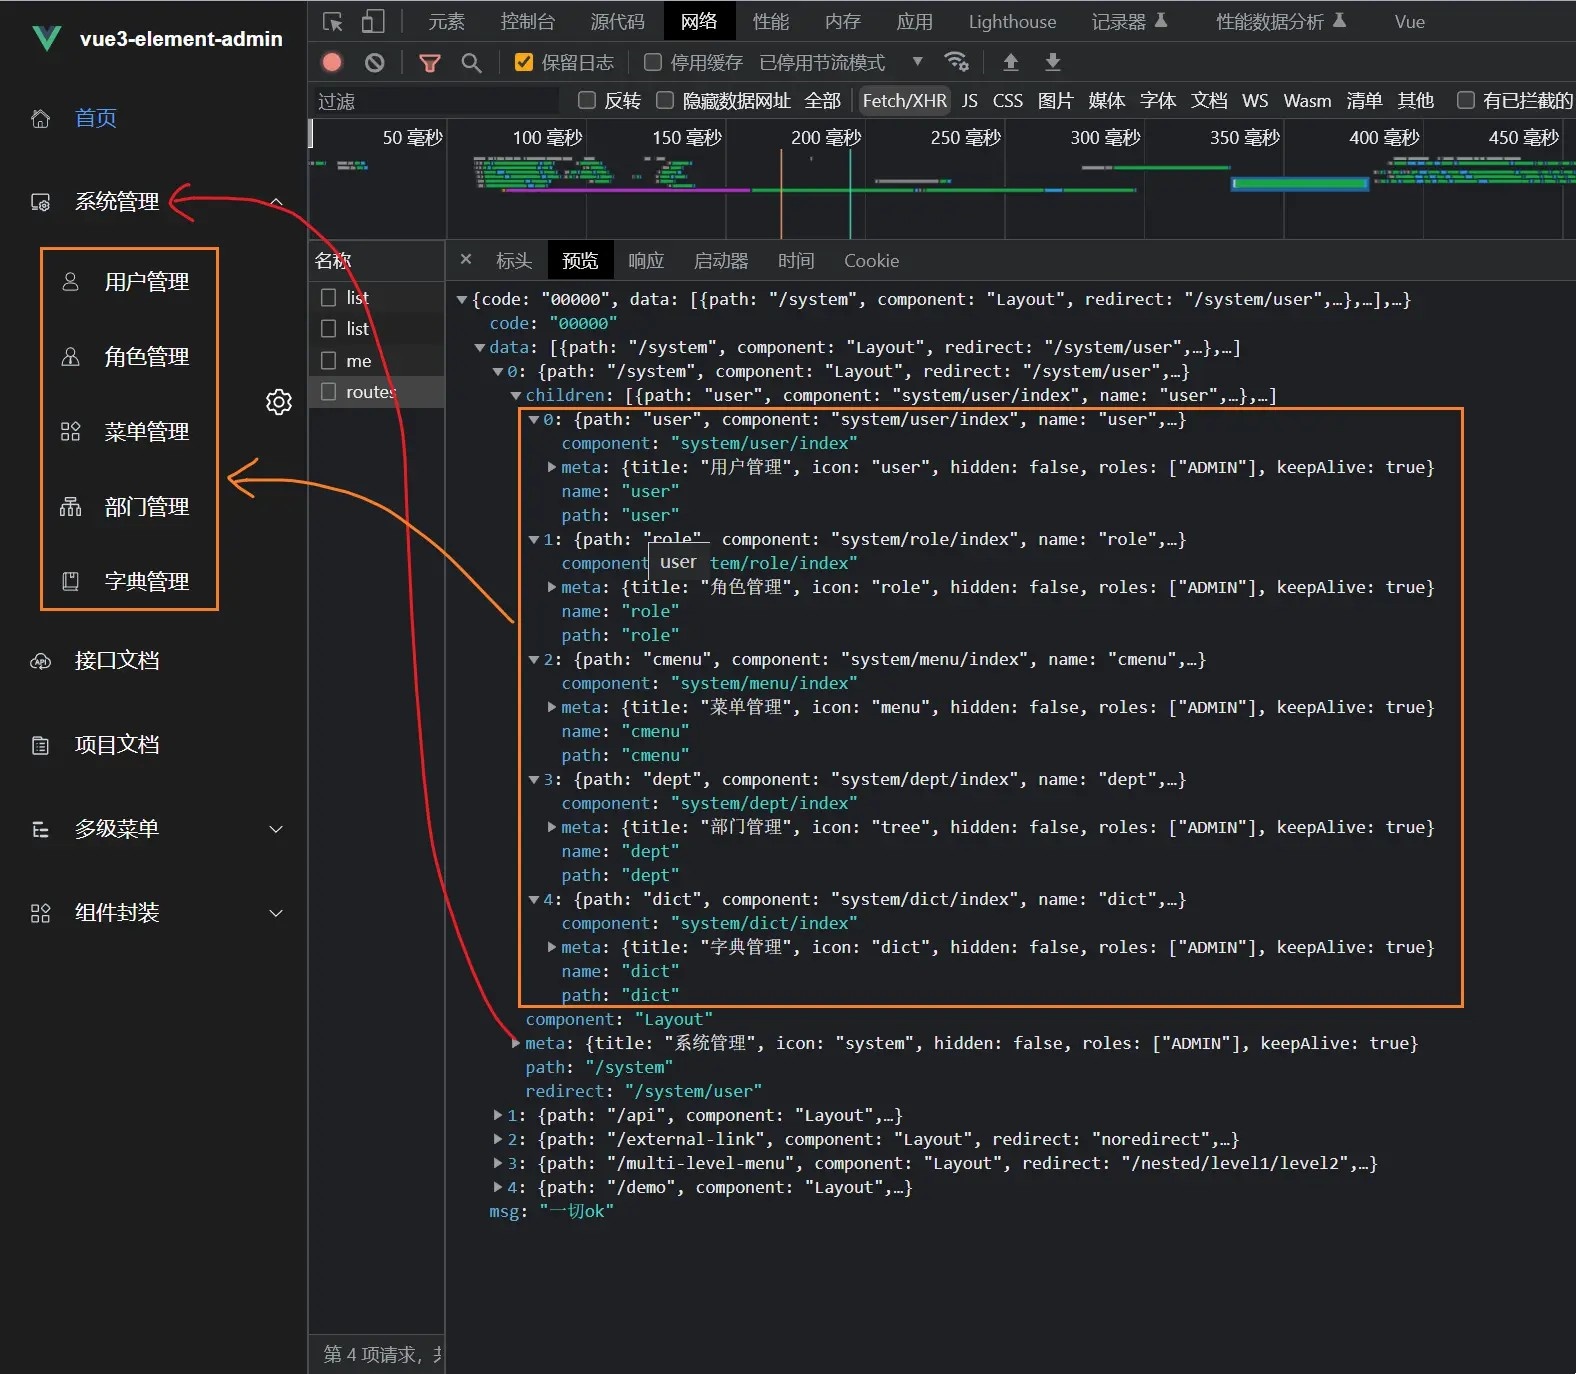
接口获取得到的路由数据
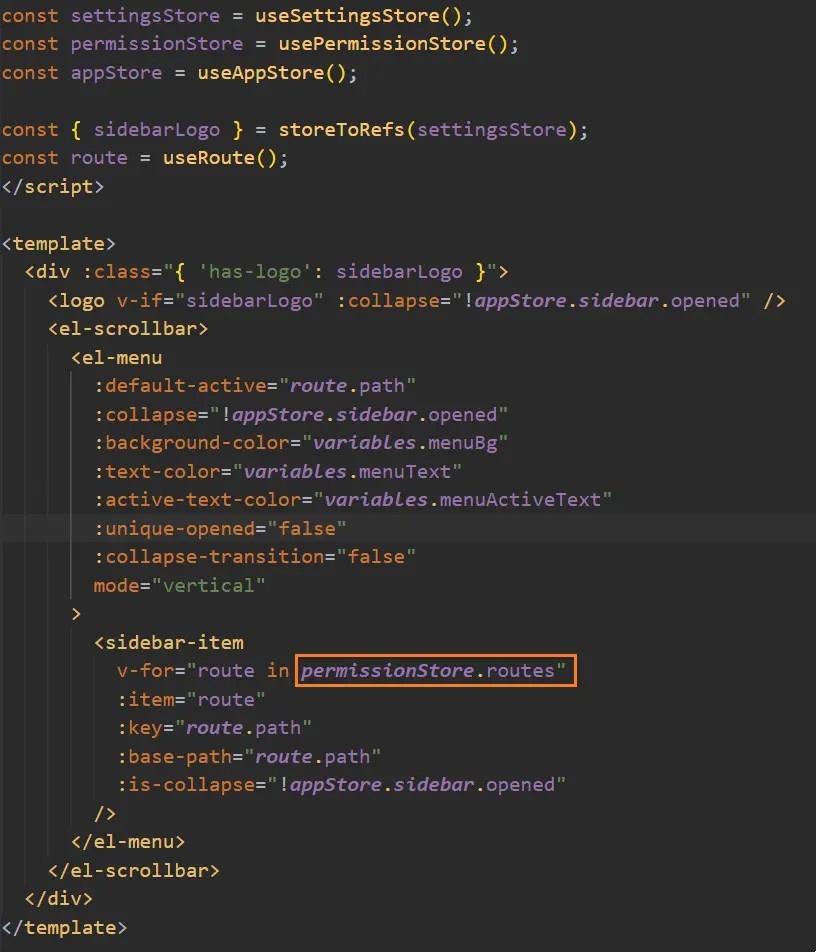
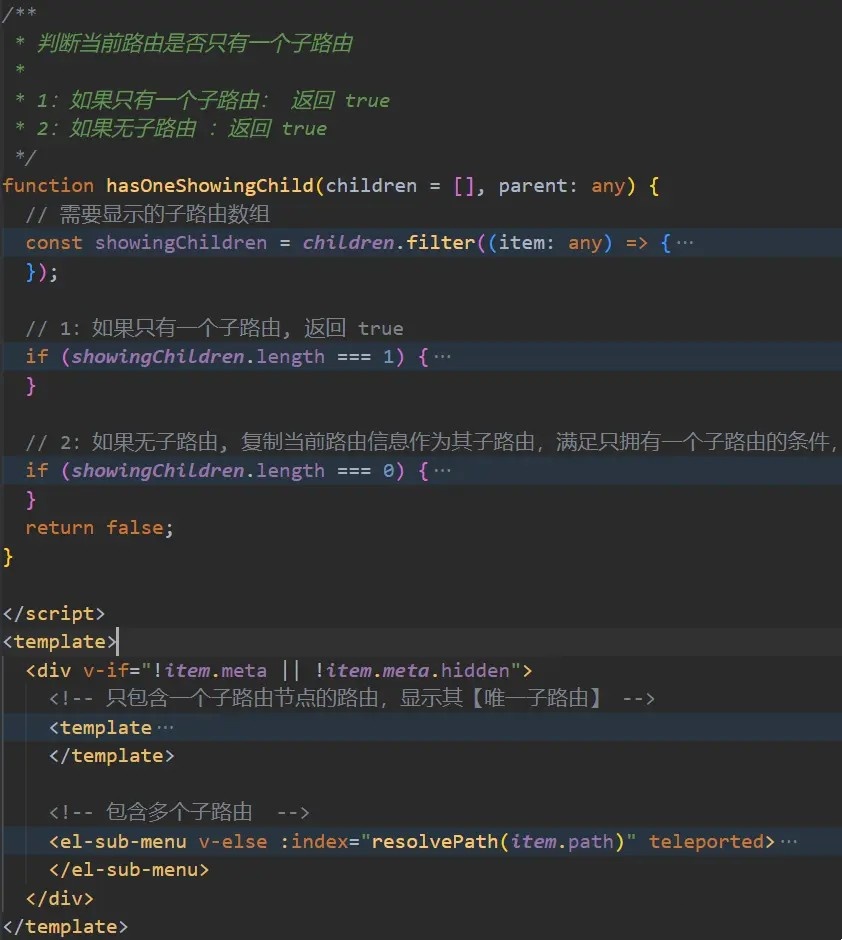
根据路由数据 (routes)生成菜单的关键代码
| src/layout/componets/Sidebar/index.vue | src/layout/componets/Sidebar/SidebarItem.vue |
|---|---|
 |
 |
8.配置 Pinia
Pinia 是 Vue 的专属状态管理库,它允许你跨组件或页面共享状态。
参考:Pinia 官方文档
1.安装依赖
npm install pinia2.main.ts 引入 pinia
// src/main.ts
import { createPinia } from "pinia";
import App from "./App.vue";

createApp(App).use(createPinia()).mount("#app");
3.定义 Store
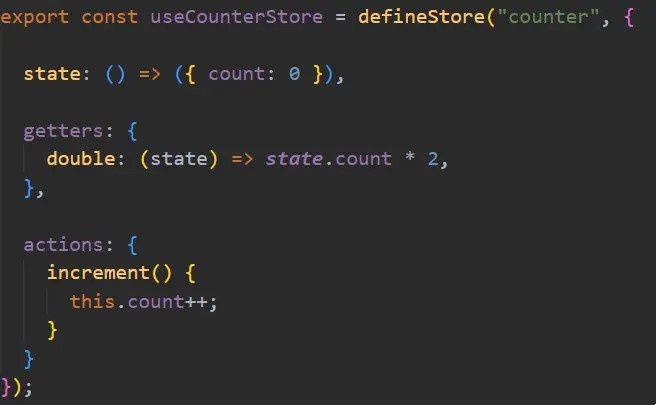
根据 Pinia 官方文档-核心概念 描述 ,Store 定义分为选项式和组合式 , 先比较下两种写法的区别:
| 选项式 Option Store | 组合式 Setup Store |
|---|---|
 |
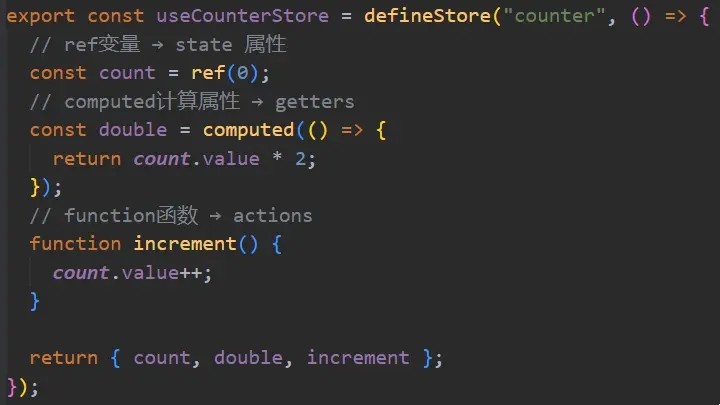 |
至于如何选择,官方给出的建议 :选择你觉得最舒服的那一个就好 。
这里选择组合式,新建文件 src/store/counter.ts
// src/store/counter.ts
import { defineStore } from "pinia";

export const useCounterStore = defineStore("counter", () => {
  // ref变量 → state 属性
  const count = ref(0);
  // computed计算属性 → getters
  const double = computed(() => {
    return count.value * 2;
  });
  // function函数 → actions
  function increment() {
    count.value++;
  }

  return { count, double, increment };
});
4.父组件
<!-- src/App.vue -->
<script setup lang="ts">
import HelloWorld from "@/components/HelloWorld.vue";
import { useCounterStore } from "@/store/counter";

const counterStore = useCounterStore();
</script>

<template>
  <h1 class="text-3xl">vue3-element-admin-父组件</h1>
  <el-button type="primary" @click="counterStore.increment">count++</el-button>
  <HelloWorld />
</template>
5.子组件
<!-- src/components/HelloWorld.vue -->
<script setup lang="ts">
import { useCounterStore } from "@/store/counter";
const counterStore = useCounterStore();
</script>

<template>
  <el-card  class="text-left text-white border-white border-1 border-solid mt-10 bg-[#242424]" >
    <template #header> 子组件 HelloWorld.vue</template>
    <el-form>
      <el-form-item label="数字:"> {{ counterStore.count }}</el-form-item>
      <el-form-item label="加倍:"> {{ counterStore.double }}</el-form-item>
    </el-form>
  </el-card>
</template>

6.效果预览
9.配置 SCSS
1.安装依赖
npm i -D sass 2.创建 variables.scss 变量文件
新建 src/styles/index.scss
添加变量 $bg-color 定义,注意规范变量以 $ 开头
// src/styles/variables.scss
$bg-color:#242424;3.Vite 配置导入 SCSS 全局变量文件
配置vite.config.ts
// vite.config.ts
css: {
    // CSS 预处理器
    preprocessorOptions: {
        // define global scss variable
        scss: {
            javascriptEnabled: true,
            additionalData: `@use "@/styles/variables.scss" as *;`
        }
    }
}4.style 标签使用SCSS全局变量
<!-- src/components/HelloWorld.vue -->
<template>
  <div class="box" />
</template>

<style lang="scss" scoped>
.box {
  width: 100px;
  height: 100px;
  background-color: $bg-color;
}
</style>5.TypeScript生效
上面导入的 SCSS 全局变量在 TypeScript 不生效的,需要创建一个以 .module.scss 结尾的文件
// src/styles/variables.module.scss

// 导出 variables.scss 文件的变量
:export{
    bgColor:$bg-color
}
TypeScript 使用 SCSS 全局变量
<!-- src/components/HelloWorld.vue -->
<script setup lang="ts">
  import variables from "@/styles/variables.module.scss";
  console.log(variables.bgColor)
</script>

<template>
  <div style="width:100px;height:100px" :style="{ 'background-color': variables.bgColor }" />
</template>
10.配置 UnoCSS
UnoCSS 是一个具有高性能且极具灵活性的即时原子化 CSS 引擎 。
1.安装依赖
pnpm install -D unocss2.vite.config.ts 配置
// vite.config.ts
import UnoCSS from 'unocss/vite'
import { defineConfig } from 'vite'

export default defineConfig({
  plugins: [
    UnoCSS({
        hmrTopLevelAwait: false,
    }),
  ],
})
3.创建 uno.config.ts 文件
// uno.config.ts
import { defineConfig, presetTypography, presetUno } from 'unocss';
import presetRemToPx from '@unocss/preset-rem-to-px';

export default defineConfig({
    //  排除
    content: {
        pipeline: {
            exclude: ['node_modules']
        }
    },
    // ...UnoCSS options
    presets: [
        //  默认预设
        presetUno(),
        //  文字排版预设
        presetTypography(),
        presetRemToPx({
            baseFontSize: 4 // 设置为4,实现w-1=1px
        })
    ],
    /** 自定义规则 */
    rules: [
        // ['font-bold', { fontWeight: 'bold' }],
        // ['text-base', { fontSize: '16px'}]
    ],
    /** 自定义快捷方式 */
    shortcuts: {
        'm-0-auto': 'm-0 ma', // margin: 0 auto
        'wh-full': 'w-full h-full', // width: 100%, height: 100%
        'flex-center': 'flex justify-center items-center', // flex布局居中
        'flex-x-center': 'flex justify-center', // flex布局:主轴居中
        'flex-y-center': 'flex items-center', // flex布局:交叉轴居中
        'text-overflow': 'overflow-hidden whitespace-nowrap text-ellipsis', // 文本溢出显示省略号
        'text-break': 'whitespace-normal break-all break-words' // 文本溢出换行
    }
});
4.main.ts 引入 virtual.css`
// main.ts
import 'virtual:uno.css'
5.使用插件 @unocss/preset-rem-to-px
这个插件的作用就是将 unocss 的预设单位rem转换成px
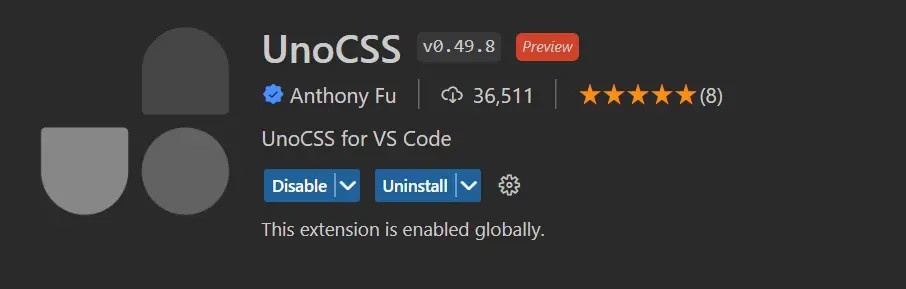
pnpm add @unocss/preset-rem-to-px -D6.VSCode 安装 UnoCSS 插件
再看下具体使用方式和实际效果:
| 代码 | 效果 |
|---|---|
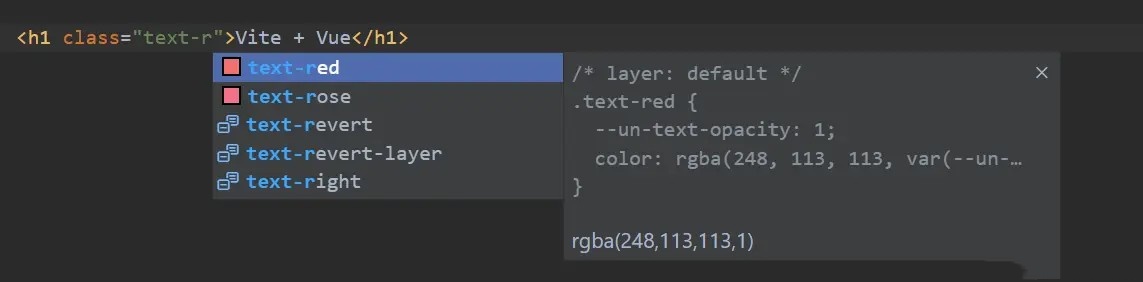 |
 |
如果UnoCSS 插件智能提示不生效,请参考:VSCode插件UnoCSS智能提示不生效解决。
11.配置 SVG图标
通过 vite-plugin-svg-icons 插件整合
Iconfont第三方图标库实现本地图标
1.安装依赖
pnpm install -D fast-glob@3.2.11
pnpm install -D vite-plugin-svg-icons@2.0.1 2.创建src/assets/icons目录
放入从 Iconfont 复制的 svg 图标
3.main.ts 引入注册脚本
// src/main.ts
import 'virtual:svg-icons-register';4.vite.config.ts配置插件
// vite.config.ts
import { createSvgIconsPlugin } from 'vite-plugin-svg-icons';

export default ({command, mode}: ConfigEnv): UserConfig => {
    return (
        {
            plugins: [
                createSvgIconsPlugin({
                    // 指定需要缓存的图标文件夹
                    iconDirs: [path.resolve(process.cwd(), 'src/assets/icons')],
                    // 指定symbolId格式
                    symbolId: 'icon-[dir]-[name]',
                })
            ]
        }
    )
}
5.SVG 组件封装
<!-- src/components/SvgIcon/index.vue -->
<script setup lang="ts">
const props = defineProps({
    prefix: {
        type: String,
        default: "icon",
    },
    iconClass: {
        type: String,
        required: false,
    },
    color: {
        type: String,
    },
    size: {
        type: String,
        default: "1em",
    },
});

const symbolId = computed(() => `#${props.prefix}-${props.iconClass}`);
</script>

<template>
    <svg
         aria-hidden="true"
         class="svg-icon"
         :style="'width:' + size + ';height:' + size"
         >
        <use :xlink:href="symbolId" :fill="color" />
    </svg>
</template>

<style scoped>
.svg-icon {
    display: inline-block;
    outline: none;
    width: 1em;
    height: 1em;
    vertical-align: -0.15em; /* 因icon大小被设置为和字体大小一致,而span等标签的下边缘会和字体的基线对齐,故需设置一个往下的偏移比例,来纠正视觉上的未对齐效果 */
    fill: currentColor; /* 定义元素的颜色,currentColor是一个变量,这个变量的值就表示当前元素的color值,如果当前元素未设置color值,则从父元素继承 */
    overflow: hidden;
}
</style>
6.组件使用
<!-- src/components/HelloWorld.vue -->
<template>
    <el-button type="info"><svg-icon icon-class="block"/>SVG 本地图标</el-button>
</template>
12.配置 Element Plus
1.安装unpligin自动导入插件
pnpm install unplugin-vue-components unplugin-auto-import -D2.安装 Element Plus
pnpm install element-plus3.安装自动导入 Icon 依赖
pnpm install unplugin-icons -D3.配置vite.config.ts
参考: element-plus-best-practices - vite.config.ts
// vite.config.ts
import vue from "@vitejs/plugin-vue";
import { UserConfig, ConfigEnv, loadEnv, defineConfig } from "vite";

import AutoImport from "unplugin-auto-import/vite"
import Compnents from "unplugin-vue-components/vite"

import { ElementPlusResolver } from "unplugin-vue-components/resolvers";
import Icons from "unplugin-icons/vite";
import IconsResolver from "unplugin-icons/resolver";

import { resolve } from "path";

const pathSrc = resolve(__dirname, "src");
export default ({ mode }: ConfigEnv): UserConfig => {
    return {
        resolve: {
            alias: {
                "@": pathSrc,
            }
        },
        plugins: [
            AutoImport({
                resolvers: [
                    // 自动导入 Vue 相关函数,如:ref, reactive, toRef 等
                    // imports: ["vue", "@vueuse/core", "pinia", "vue-router", "vue-i18n"],
                    imports: ["vue", "@vueuse/core",],
                resolvers: [
                    // 自动导入 Element Plus 相关函数,如:ElMessage, ElMessageBox... (带样式)
                    ElementPlusResolver(),
                    // 自动导入图标组件
                    IconsResolver({}),
                ],
                // 是否在 vue 模板中自动导入
                vueTemplate: true,
                // 指定自动导入函数TS类型声明文件路径 (false:关闭自动生成)
                dts: false,
                // dts: path.resolve(pathSrc, 'types', 'auto-imports.d.ts')
            }),
            Components({
                resolvers: [
                    // 自动导入 Element Plus 组件
                    ElementPlusResolver(),
                    // 自动注册图标组件
                    IconsResolver({
                        // element-plus图标库,其他图标库 https://icon-sets.iconify.design/
                        enabledCollections: ["ep"],
                    }),
                ],
                // 指定自定义组件位置(默认:src/components)
                dirs: ["src/components", "src/**/components"],
                // 指定自动导入组件TS类型声明文件路径 (false:关闭自动生成)
                dts: false,
                // dts: "src/types/components.d.ts",
            }),
            Icons({
                // 自动安装图标库
                autoInstall: true,
            }),
        ],
    };
};
4.在main.ts引入
注意:按需引入时element-plus不需要在main.ts中引入,插件会自动挂载处理,可以在全局直接使用
这里在main.ts中引入element-plus样式与图标
import * as ElementPlusIconsVue from '@element-plus/icons-vue'; //引入图标
import 'element-plus/dist/index.css'; //引入样式

//...

for (const [key, component] of Object.entries(ElementPlusIconsVue)) {
  app.component(key, component);
}
13.配置 Element Plus 暗黑模式
Element Plus 2.2.0 版本开始支持暗黑模式,启用方式参考 Element Plus 官方文档 - 暗黑模式, 官方也提供了示例 element-plus-vite-starter 模版 。
这里根据官方文档和示例讲述如何使用 VueUse 的 useDark 方法实现暗黑模式的动态切换。
1.导入 Element Plus 暗黑模式变量
// src/main.ts
import 'element-plus/theme-chalk/dark/css-vars.css'
2.切换暗黑模式设置
<!-- src/layout/components/Settings/index.vue -->
<script setup lang="ts">

import IconEpSunny from '~icons/ep/sunny';
import IconEpMoon from '~icons/ep/moon';

/**
 * 暗黑模式
 */
const settingsStore = useSettingsStore();
const isDark = useDark();
const toggleDark = () => useToggle(isDark);

</script>

<template>
  <div class="settings-container">
    <h3 class="text-base font-bold">项目配置</h3>
    <el-divider>主题</el-divider>

    <div class="flex justify-center" @click.stop>
      <el-switch
        v-model="isDark"
        @change="toggleDark"
        inline-prompt
        :active-icon="IconEpMoon"
        :inactive-icon="IconEpSunny"
        active-color="var(--el-fill-color-dark)"
        inactive-color="var(--el-color-primary)"
      />
    </div>
  </div>
</template>
3.自定义变量
除了 Element Plus 组件样式之外,应用中还有很多自定义的组件和样式,像这样的:
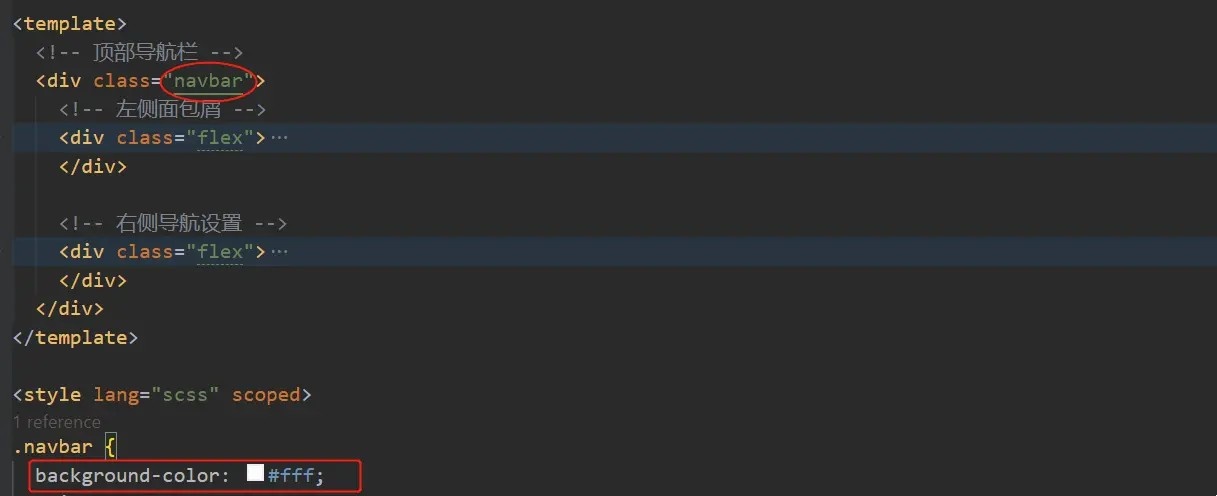
应对自定义组件样式实现暗黑模式步骤如下:
1.新建 src/styles/dark.scss
html.dark {
  /* 修改自定义元素的样式 */
  .navbar {
    background-color: #141414;
  }
}
2.在 Element Plus 的样式之后导入它
// main.ts
import 'element-plus/theme-chalk/dark/css-vars.css'
import '@/styles/dark.scss'
14.配置 环境变量
新建 .env(所有环境生效).env.development(开发环境配置) .env.production(生产环境配置)
1.定义变量
以 VITE_ 为前缀定义变量
VITE_BASE_URL = '//127.0.0.1:9000/api'2.定义变量ts类型
修改vite-env.d.ts
/// <reference types="vite/client" />
interface ImportMetaEnv {
  readonly VITE_BASE_URL: string;
}

interface ImportMeta {
  readonly env: ImportMetaEnv;
}
3.使用变量
import.meta.env.VITE_BASE_URL4.在vite.config.ts中使用环境变量
使用 loadEnv 读取环境变量
import { defineConfig, loadEnv } from 'vite';
//...

export default ({ mode }) => {
  console.log('mode', loadEnv(mode, process.cwd()).VITE_BASE_URL); //127.0.0.1:9000/api
  return defineConfig({
      //...
  });
};
使用 yarn dev 启动命令,读取.env 与 .env.development的内容
修改package.json
"scripts": {
    "test":"vite --mode test", //新增
},
使用 yarn test 启动命令,读取.env 与 .env.test的内容
15.配置 Axios
Axios 基于promise可以用于浏览器和node.js的网络请求库
参考: Axios 官方文档
1.安装
pnpm install axios2.Axios 工具类封装
//  src/utils/request.ts
import axios, { InternalAxiosRequestConfig, AxiosResponse } from 'axios';
import { useUserStoreHook } from '@/store/modules/user';

// 创建 axios 实例
const service = axios.create({
  baseURL: import.meta.env.VITE_APP_BASE_API,
  timeout: 50000,
  headers: { 'Content-Type': 'application/json;charset=utf-8' }
});

// 请求拦截器
service.interceptors.request.use(
  (config: InternalAxiosRequestConfig) => {
    const userStore = useUserStoreHook();
    if (userStore.token) {
      config.headers.Authorization = userStore.token;
    }
    return config;
  },
  (error: any) => {
    return Promise.reject(error);
  }
);

// 响应拦截器
service.interceptors.response.use(
  (response: AxiosResponse) => {
    const { code, msg } = response.data;
    // 登录成功
    if (code === '00000') {
      return response.data;
    }

    ElMessage.error(msg || '系统出错');
    return Promise.reject(new Error(msg || 'Error'));
  },
  (error: any) => {
    if (error.response.data) {
      const { code, msg } = error.response.data;
      // token 过期,跳转登录页
      if (code === 'A0230') {
        ElMessageBox.confirm('当前页面已失效,请重新登录', '提示', {
          confirmButtonText: '确定',
          type: 'warning'
        }).then(() => {
          localStorage.clear(); // @vueuse/core 自动导入
          window.location.href = '/';
        });
      }else{
          ElMessage.error(msg || '系统出错');
      }
    }
    return Promise.reject(error.message);
  }
);

// 导出 axios 实例
export default service;
16.配置 反向代理
修改vite.config.ts
export default defineConfig({
    ...
    server: {
        host: '0.0.0.0',
        port: 8080,
        open: true,
        https: false,
        proxy: {
            '/api': {
                target: '要代理的地址',
                changeOrigin: true,
                ws: true,
                rewrite: (path: string) => path.replace(/^\/api/, ''),
            },
        },
    },
});
17.配置 打包
修改vite.config.ts
1.分包
通过() => import()形式加载的组件会自动分包,第三方插件需手动分包
build: {
    rollupOptions: {
      output: {
        manualChunks: {
          vue: ['vue', 'pinia', 'vue-router'],
          elementIcons: ['@element-plus/icons-vue'],
        },
      },
    },
  },
2.生成.gz文件
- 安装
pnpm install vite-plugin-compression -D- 修改vite.config.ts
默认情况下插件在开发 (serve) 和生产 (build) 模式中都会调用,使用 apply 属性指明它们仅在 ‘build’ 或 ‘serve’ 模式时调用
这里打包生成 .gz 插件仅需在打包时使用
import viteCompression from 'vite-plugin-compression'

  plugins: [
    //...
    {
      ...viteCompression(),
      apply: 'build',
    },
  ],
3.js和css文件夹分离
export default defineConfig({
    build: {
      rollupOptions: {
        output: {
          chunkFileNames: "static/js/[name]-[hash].js",
          entryFileNames: "static/js/[name]-[hash].js",
          assetFileNames: "static/[ext]/[name]-[hash].[ext]",
        },
      },
    },
  });
4.分析生成包的大小
1.安装
rollup-plugin-visualizer- 修改vite.config.ts
import { visualizer } from 'rollup-plugin-visualizer';

  plugins: [
    //...
    visualizer({ open: true }),
  ],
18.vite与webpack使用区别
1.静态资源处理
webpack:使用require处理
vite:使用 new URL(url, import.meta.url).href 处理
import.meta.url 包含了对于目前 ES 模块的绝对路径
new URL(url [, base]) 构造函数返回一个新创建的 URL 对象,如果url 是相对 URL,则会将 base 用作基准 URL。如果 url 是绝对 URL,则无论参数base是否存在,都将被忽略
new URL('../assets/images/home.png', import.meta.url).href

//在src/constants/menus.ts下引入图片
//import.meta.url返回 http://localhost:8080/src/constants/menus.ts

//new URL(...).href返回
//http://localhost:8080/src/assets/images/home.png
2.组件自动化注册
webpack
<script>
const path = require('path');
//读取@/components/BaseEchartsModel下所有.vue文件
const files = require.context('@/components/BaseEchartsModel', false, /\.vue$/);
const modules = {};
files.keys().forEach((key) => {
  const name = path.basename(key, '.vue');
  modules[name] = files(key).default || files(key);
});
export default {
  name: 'BaseEcharts',
  components: modules,
};
</script>
vite
<script setup lang="ts">
//读取@/components/BaseEchartsModel下所有.vue文件
import.meta.glob('@/components/BaseEchartsModel/*.vue');
</script>