# MacOS 下 nvm 的安装
版本记录:
2020.09.18 初版
2020.09.19 解决环境变量添加后,每次打开都需要重新 source .bash_profile 的问题
# 一、使用 curl 安装的步骤
# 1. 安装命令:
$ curl -o- https://raw.githubusercontent.com/nvm-sh/nvm/v0.35.3/install.sh | bash
# 2. 可能遇到的问题:
curl: (7) Failed to connect to raw.githubusercontent.com port 443: Connection refused

此问题的解决方案请参照一下这篇文章:
《curl: (7) Failed to connect to raw.githubusercontent.com port 443: Connection refused》
# 3. 安装:

# 4. 检查是否安装成功
关闭再打开终端,输入
$ nvm --version
# 5. 可能遇到的问题
zsh: command not found: nvm
# 6. 解决问题 5 的步骤:
# ① 再次安装,提示已经安装了 nvm(不用执行)
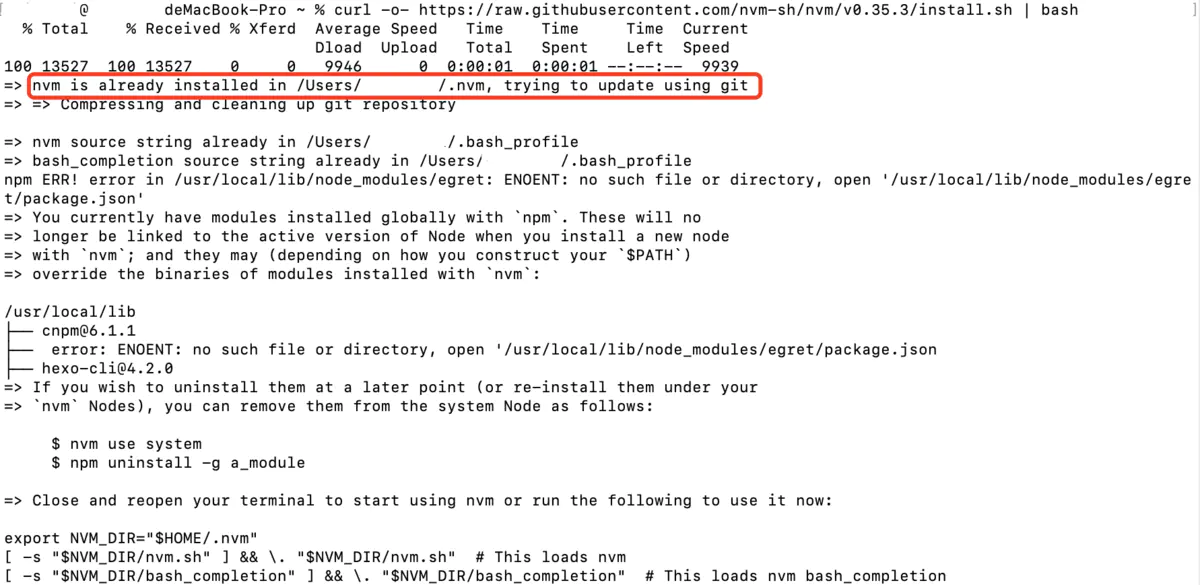
username@usernamedeMacBook-Pro ~ % curl -o- https://raw.githubusercontent.com/nvm-sh/nvm/v0.35.3/install.sh | bash
  % Total    % Received % Xferd  Average Speed   Time    Time     Time  Current
                                 Dload  Upload   Total   Spent    Left  Speed
100 13527  100 13527    0     0   9946      0  0:00:01  0:00:01 --:--:--  9939
=> nvm is already installed in /Users/username/.nvm, trying to update using git
=> => Compressing and cleaning up git repository

=> nvm source string already in /Users/username/.bash_profile
=> bash_completion source string already in /Users/username/.bash_profile
npm ERR! error in /usr/local/lib/node_modules/egret: ENOENT: no such file or directory, open '/usr/local/lib/node_modules/egret/package.json'
=> You currently have modules installed globally with `npm`. These will no
=> longer be linked to the active version of Node when you install a new node
=> with `nvm`; and they may (depending on how you construct your `$PATH`)
=> override the binaries of modules installed with `nvm`:

/usr/local/lib
├── cnpm@6.1.1
├──  error: ENOENT: no such file or directory, open '/usr/local/lib/node_modules/egret/package.json
├── hexo-cli@4.2.0
=> If you wish to uninstall them at a later point (or re-install them under your
=> `nvm` Nodes), you can remove them from the system Node as follows:

     $ nvm use system
     $ npm uninstall -g a_module

=> Close and reopen your terminal to start using nvm or run the following to use it now:

export NVM_DIR="$HOME/.nvm"
[ -s "$NVM_DIR/nvm.sh" ] && \. "$NVM_DIR/nvm.sh"  # This loads nvm
[ -s "$NVM_DIR/bash_completion" ] && \. "$NVM_DIR/bash_completion"  # This loads nvm bash_completion
# ② 配置.bash_profile(环境变量)
# 进入当前用户的home目录
$ cd ~/
# 创建. bash_profile文件
$ touch .bash_profile
# 创建. bash_profile文件
$ open .bash_profile
在打开的记事本中加入
export NVM_DIR=~/.nvm
source ~/.nvm/nvm.sh
# ③ 使加入的环境变量生效(很重要)
source .bash_profile
# ④ 输入 nvm --version 检查是否生效

这里已经显示安装的 nvm 版本了,说明安装成功啦~~~
你以为到这里就结束了吗?当然没有!!还是有可能出现以下问题:
环境变量添加后,每次打开都需要重新 source .bash_profile 才能使 nvm 生效,否则依然提示 zsh: command not found: nvm
# ⑤ 在.zshrc 中添加环境变量
- 在通过终端在记事本中打开.zshrc
# 注意是在当前用户的home目录
$ open .zshrc
- 在.zshrc 文件末尾处添加以下环境变量:
export NVM_DIR="$HOME/.nvm"
[ -s "$NVM_DIR/nvm.sh" ] && . "$NVM_DIR/nvm.sh" # This loads nvm
- 关闭记事本后,在终端中重新启动.zshrc 配置
$ source .zshrc
- 这样,以后每次新打开一个 bash,nvm 都会被自动添加到环境变量中了。