每个前端人都经历过的一个痛处就是,在写页面 ui 样式时不停的在 html 文件(或代码区域)和 css 文件(或代码区域)之间来回切换,这种聚焦点分离让 ui 样式的开发有点点烦。原子化 css 正是这一痛处的有效的解决方案。
# 简介
原子化的优点也即原子化,因为所有书写的 css 都是以最原子的形态出现,所以可复用性无解肥。
原子化中每个 css 属性和值都有一个对应简写的 class 来实现,通常这些简写也符合认知规律,所以书写起来并没有很大心智负担,熟能生巧(唯手熟耳)。
这有点类似在 html 中书写 style,不过更加简单和快捷。比如:
w-10就是width: 100pxmx-10就是margin-left: 10px; margin-right: 10px;last-mr-0就是:last-child { margin-right: 0; }
而且通过自定义规则配置,还能实现更多的简写,如:
wh-full就是width: 100%; height: 100%bb-1-red就是border-bottom: 1px solid red;f-b就是display: flex; justify-content: space-between; align-items: center;
在实际应用中代码如下:
<div class="inline-block h-164 bg-#F2F3F5 rounded-4 p-20 pt-16!"> | |
<div class="mb-8 text-14 text-#7A8699">示例(请按照示例上传真实、有效的集装箱照片):</div> | |
<div class="f-s"> | |
<div class="relative w-100 h-100 mr-8 last-mr-0" v-for="item in sampleBoxPics" :key="item.id"> | |
<img class="wh-full object-cover" :src="`https://filecdn.xxx.com/xxx/box_pic_${item.id}.png`" alt="" /> | |
<div class="absolute bottom-0 w-full f-c bg-#1D2129/80 text-white text-12"></div> | |
</div> | |
</div> | |
</div> |
# 安装配置(vue + vite 项目中):
安装 unocss 和工具类预设:
pnpm i -D unocss @unocss/preset-uno |
在 main.ts 中引入 uno.css
import { createApp } from 'vue' | |
import App from './App.vue' | |
import 'virtual:uno.css' | |
createApp(App).mount('#app') |
在 vite.config.ts 文件中配置
import { defineConfig } from 'vite' | |
import vue from '@vitejs/plugin-vue' | |
import UnoCSS from 'unocss/vite' | |
export default defineConfig({ | |
plugins: [ | |
vue(), | |
UnoCSS(), | |
], | |
... | |
}) |
新建 uno.config.ts 文件并配置(此处是我个人的配置偏好,可以根据喜好自己配置,或者根据项目需要配置一些常用公共样式):
// uno.config.ts | |
import { defineConfig, presetUno } from 'unocss' | |
import presetRemToPx from '@unocss/preset-rem-to-px' | |
export default defineConfig({ | |
presets: [ | |
presetUno(), | |
//unocss 默认 rem,转成 px | |
presetRemToPx({ | |
baseFontSize: 4, | |
}) as any, | |
], | |
shortcuts: { | |
'f-b': 'flex justify-between items-center', | |
'f-c': 'flex justify-center items-center', | |
'f-s': 'flex justify-start items-center', | |
'f-e': 'flex justify-end items-center', | |
'text-overflow': 'truncate', | |
'wh-full': 'w-full h-full', | |
}, | |
rules: [ | |
[/^b-(\d+)$/, match => ({ 'border-width': `${match[1]}px` })], | |
[/^b-(\d+)-#([\w]+)$/, match => ({ 'border': `solid ${match[1]}px #${match[2]}` })], | |
[/^bt-(\d+)-#([\w]+)$/, match => ({ 'border-top': `solid ${match[1]}px #${match[2]}` })], | |
[/^bb-(\d+)-#([\w]+)$/, match => ({ 'border-bottom': `solid ${match[1]}px #${match[2]}` })], | |
[/^bl-(\d+)-#([\w]+)$/, match => ({ 'border-left': `solid ${match[1]}px #${match[2]}` })], | |
[/^br-(\d+)-#([\w]+)$/, match => ({ 'border-right': `solid ${match[1]}px #${match[2]}` })], | |
[/^px-(\d+)$/, match => ({ 'padding-left': `${match[1]}px`, 'padding-right': `${match[1]}px` })], | |
[/^py-(\d+)$/, match => ({ 'padding-top': `${match[1]}px`, 'padding-bottom': `${match[1]}px` })], | |
[/^mx-(\d+)$/, match => ({ 'margin-left': `${match[1]}px`, 'margin-right': `${match[1]}px` })], | |
[/^my-(\d+)$/, match => ({ 'margin-top': `${match[1]}px`, 'margin-bottom': `${match[1]}px` })], | |
[/^pt-(\d+)$/, match => ({ 'padding-top': `${match[1]}px` })], | |
[/^pb-(\d+)$/, match => ({ 'padding-bottom': `${match[1]}px` })], | |
[/^pl-(\d+)$/, match => ({ 'padding-left': `${match[1]}px` })], | |
[/^pr-(\d+)$/, match => ({ 'padding-right': `${match[1]}px` })], | |
[/^mt-(\d+)$/, match => ({ 'margin-top': `${match[1]}px` })], | |
[/^mb-(\d+)$/, match => ({ 'margin-bottom': `${match[1]}px` })], | |
[/^ml-(\d+)$/, match => ({ 'margin-left': `${match[1]}px` })], | |
[/^mr-(\d+)$/, match => ({ 'margin-right': `${match[1]}px` })], | |
], | |
}) |
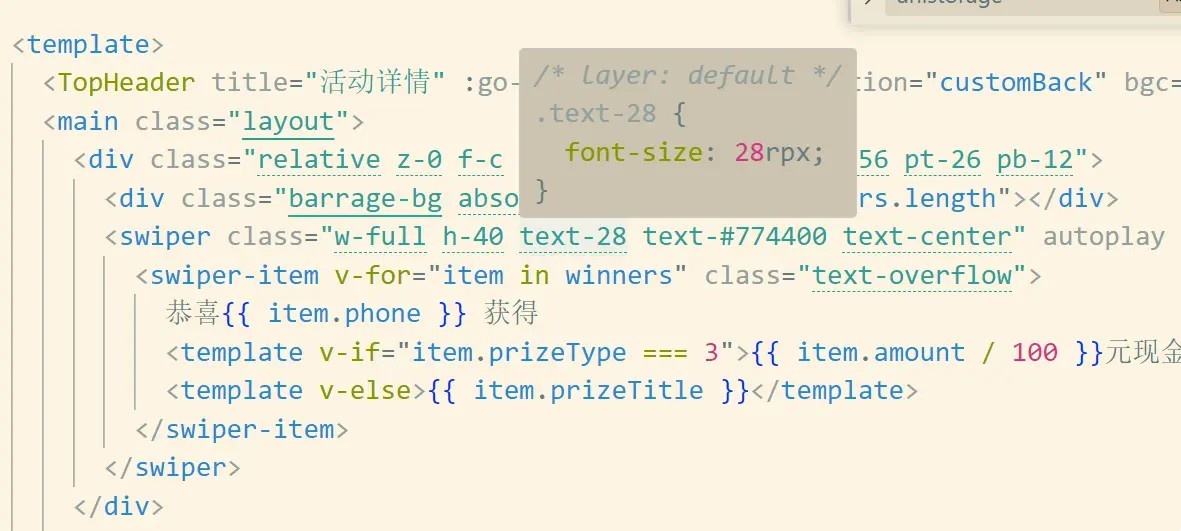
vscode 还有 UnoCSS 扩展,可以预览编译后的 class:

# 演练
有兴趣的少侠可以点击 此处 进行在线演练,零配置体验 unocss。
也可以在 这里 查看类名书写后编写的结果。
而我最常用的其实是 tailwindcss 文档,在这里可以查看各种 css 属性的书写方式(unocss 是兼容 tailwindcss 的,而 unocss 官网貌似并没有提供此类文档)。
# 缺点
原子化 css 在编写复杂的样式效果时,会造成 html 的 class 名非常长,而且 vue react 等框架中,都会有部分 js 逻辑注入 html 中,这样 html 文件会变得臃肿不堪。
原子化 css 违背了组件化的设计思想,比如你用 unocss 写了一个组件,后来发现比较通用想发包就比较麻烦了。
维护项目时,不再可以通过 css 名来定位代码位置,接手陌生项目时会比较痛苦。
# 最后
虽然存在很多问题,但是原子化带来的好处是无可比拟的。而且他让你的项目避免了很多重复混乱的 css 命名。